
Setting up Elasticsearch and Kibana with docker-compose
Aleksandar is accomplished individual with a strong background in Java (20+ years in IT business). He believes in the power of the Internet, have a desire to learn more and to also be involved in its future development. He is also goal oriented, analytical and sharp individual with a lot of energy and also spread that inspiration among his co-workers. Coming from city of Novi Sad, one of the biggest IT development center in Serbia, Aleksandar has been working in various environments. His professional career starts as desktop application developer using Delphi IDE, and in 2007. joined international company Levi9 as Java Web developer. As from 2015. actively learning and helping clients to prepare and adopt for The Cloud. In 2017. joined NovaCode d.o.o. where he works nowadays as Software Architect. In private life husband, father of 2: boy and little girl, likes to play table tennis.
Disclaimer: At the moment of writing this article the current version of Elasticsearch is 8.11.1.
I've been using Elasticsearch for some time, both in production and development. I've been actively working with this search engine I would say almost 4 years now. Started with version 6.x, migrated to version 7.x and recently I've starting investigating oportunity to "catch the train" with version 8.x.
This article covers how to properly setup Elasticsearch (ES) and Kibana (for development purposes) with Docker Compose. As many of you may know ES crew was actively implementing bunch of a security stuff releated to ES service, specially as of version 7.x. Therefore I've decided to divide this article into two main sections:
one how you can run ES & Kibana without notion of security at all (which maybe acceptable for the most development/trial purposes),
second, more preferable way, with security turned on.
Both will cover running ES as single node cluster, but as a bonus I'll just paste docker-compose.yaml file how you can extend second option to run with multi-node (3 nodes) cluster.
Without furter ado here are these two ways ...
Single Node ES cluster and Kibana without security
Let's start first with creating directory where we will put our files. I tend to extrapolate configuration properties (as STACK_VERSION) to separate .env file. Therefore we need to have folder that will hold two files, already mentioned .env file and docker-compose.yaml file itself.
STACK_VERSION=8.11.1
version: "3"

services:
    elasticsearch:
      image: docker.elastic.co/elasticsearch/elasticsearch:${STACK_VERSION}
      container_name: es01
      environment:
        - "node.name=es01"
        - "cluster.name=cluster-ai"
        - "discovery.type=single-node"
        - "bootstrap.memory_lock=true"
        - "xpack.security.enabled=false"
        - "ES_JAVA_OPTS=-Xms512m -Xmx512m"
        - "TZ=Europe/Rome"
      ulimits:
        memlock:
          soft: -1
          hard: -1
        nofile:
          soft: 65536
          hard: 65536
      volumes:
        - "es-data:/usr/share/elasticsearch/data"
      ports:
        - "9200:9200"
        - "9300:9300"
      healthcheck:
        test: ["CMD-SHELL", "curl -s http://localhost:9200/_cat/health?h=status | grep -q green"]
        retries: 300
        interval: 1s

    kibana:
      image: docker.elastic.co/kibana/kibana:${STACK_VERSION}
      container_name: kibana
      depends_on: [ "elasticsearch" ]
      environment:
        ELASTICSEARCH_HOSTS: http://elasticsearch:9200
      ports:
        - "5601:5601"
      healthcheck:
        test: ["CMD", "curl", "-f", "http://localhost:5601"]
        retries: 300
        interval: 1s


volumes:
  es-data:
    driver: local
You can find this content on the following link at https://devcraft.me platform.
Even it looks simple, at least for the people that are used to run ES and Kibana this way, let's just explain few things.
As previously mentioned, I've externalized version used in this Docker Compose file, as STACK_VERSION. This way we can easily make use of any new ES released version without touching/changing docker-compose.yaml file itself.
Next thing that you can setup is the name of the cluster, as configured as variable cluster.name=cluster-ai . I'm using this name, as I want to play with some of ML/AI features of ES therefore it is reasonable name for me to give to this experimental cluster.
Since this is single node cluster, we have to specify that in the following variable discovery.type=single-node
As mentioned before, this is setup without security surrounding ES, therefore we can disable X-Pack security at all, with setting up following variable xpack.security.enabled=true
Other variables is something that we already inherited from Elasticsearch version 7.x, like node.name, bootstrap.memory_lock and ES_JAVA_OPTS and time zone (TZ).
Now that we have both files in same folder and with proper content, we can start Elasticsearch and Kibana by using Docker Compose command as follows:
$ docker compose up -d
[+] Building 0.0s (0/0)                                                                                                                                                                                                         docker:desktop-linux
[+] Running 3/3
 ✔ Network single-node-no-security_default  Created                                                                                                                                                                                             0.0s
 ✔ Container es01                           Started                                                                                                                                                                                             0.0s
 ✔ Container kibana                         Started                                                                                                                                                                                             0.0s
We can check if everything is ok by checking Docker process list
docker ps -a
CONTAINER ID   IMAGE                                                  COMMAND                  CREATED          STATUS                    PORTS                                            NAMES
8d4a04d17122   docker.elastic.co/kibana/kibana:8.11.0                 "/bin/tini -- /usr/l…"   57 seconds ago   Up 56 seconds (healthy)   0.0.0.0:5601->5601/tcp                           kibana
83cd69976345   docker.elastic.co/elasticsearch/elasticsearch:8.11.0   "/bin/tini -- /usr/l…"   57 seconds ago   Up 56 seconds (healthy)   0.0.0.0:9200->9200/tcp, 0.0.0.0:9300->9300/tcp   es01
Now we can open the browser and type http://localhost:5601 which is URL for Kibana.
You should be getting Kibana welcome screen. NOTE: without security!


After you've done with playing with ES and Kibana, you can bring down the services by executing docker compose down command.
$ docker compose down
[+] Running 3/3
 ✔ Container kibana                         Removed                                                                                                                                                                                             1.3s
 ✔ Container es01                           Removed                                                                                                                                                                                             2.8s
 ✔ Network single-node-no-security_default  Removed                                                                                                                                                                                             0.0s
Now we can go to more complicated setup.
Single Node ES cluster and Kibana with security turned on
We start similary as we did in previous section, by creating new new folder and placing two files .env and docker-compose.yaml side by side.
First here is the content of .env file:
# Version of Elastic products
STACK_VERSION=8.11.0

# Set the cluster name
CLUSTER_NAME=cluster-ai

# Password for the 'elastic' user (at least 6 characters)
ELASTIC_PASSWORD=civilization

# Password for the 'kibana_system' user (at least 6 characters)
KIBANA_PASSWORD=firaxisgames

# Set to 'basic' or 'trial' to automatically start the 30-day trial
LICENSE=basic

# Port to expose Elasticsearch HTTP API to the host
ES_PORT=9200

# Port to expose Kibana to the host
KIBANA_PORT=5601

# Increase or decrease based on the available host memory (in bytes)
# 1073741824 B = 1024 MB = 1 GB
MEM_LIMIT=1073741824
I'll explain some of those later as they are used in services accordingly.
Here is the complete content of docker-compose.yaml file:
version: "3"

services:
  setup:
    image: docker.elastic.co/elasticsearch/elasticsearch:${STACK_VERSION}
    volumes:
      - certs:/usr/share/elasticsearch/config/certs
    user: "0"
    command: >
      bash -c '
        if [ x${ELASTIC_PASSWORD} == x ]; then
          echo "Set the ELASTIC_PASSWORD environment variable in the .env file";
          exit 1;
        elif [ x${KIBANA_PASSWORD} == x ]; then
          echo "Set the KIBANA_PASSWORD environment variable in the .env file";
          exit 1;
        fi;
        if [ ! -f config/certs/ca.zip ]; then
          echo "Creating CA";
          bin/elasticsearch-certutil ca --silent --pem -out config/certs/ca.zip;
          unzip config/certs/ca.zip -d config/certs;
        fi;
        if [ ! -f config/certs/certs.zip ]; then
          echo "Creating certs";
          echo -ne \
          "instances:\n"\
          "  - name: es01\n"\
          "    dns:\n"\
          "      - es01\n"\
          "      - localhost\n"\
          "    ip:\n"\
          "      - 127.0.0.1\n"\
          > config/certs/instances.yml;
          bin/elasticsearch-certutil cert --silent --pem -out config/certs/certs.zip --in config/certs/instances.yml --ca-cert config/certs/ca/ca.crt --ca-key config/certs/ca/ca.key;
          unzip config/certs/certs.zip -d config/certs;
        fi;
        echo "Setting file permissions"
        chown -R root:root config/certs;
        find . -type d -exec chmod 750 \{\} \;;
        find . -type f -exec chmod 640 \{\} \;;
        echo "Waiting for Elasticsearch availability";
        until curl -s --cacert config/certs/ca/ca.crt https://es01:9200 | grep -q "missing authentication credentials"; do sleep 30; done;
        echo "Setting kibana_system password";
        until curl -s -X POST --cacert config/certs/ca/ca.crt -u "elastic:${ELASTIC_PASSWORD}" -H "Content-Type: application/json" https://es01:9200/_security/user/kibana_system/_password -d "{\"password\":\"${KIBANA_PASSWORD}\"}" | grep -q "^{}"; do sleep 10; done;
        echo "All done!";
      '
    healthcheck:
      test: ["CMD-SHELL", "[ -f config/certs/es01/es01.crt ]"]
      interval: 1s
      timeout: 5s
      retries: 120


  es01:
    depends_on:
      setup:
        condition: service_healthy
    image: docker.elastic.co/elasticsearch/elasticsearch:${STACK_VERSION}
    volumes:
      - certs:/usr/share/elasticsearch/config/certs
      - es-data:/usr/share/elasticsearch/data
    ports:
      - ${ES_PORT}:9200
    environment:
      - node.name=es01
      - cluster.name=${CLUSTER_NAME}
      - ELASTIC_PASSWORD=${ELASTIC_PASSWORD}
      - bootstrap.memory_lock=true
      - discovery.type=single-node
      - discovery.seed_hosts = []
      - xpack.security.enabled=true
      - xpack.security.http.ssl.enabled=true
      - xpack.security.http.ssl.key=certs/es01/es01.key
      - xpack.security.http.ssl.certificate=certs/es01/es01.crt
      - xpack.security.http.ssl.certificate_authorities=certs/ca/ca.crt
      - xpack.security.transport.ssl.enabled=true
      - xpack.security.transport.ssl.key=certs/es01/es01.key
      - xpack.security.transport.ssl.certificate=certs/es01/es01.crt
      - xpack.security.transport.ssl.certificate_authorities=certs/ca/ca.crt
      - xpack.security.transport.ssl.verification_mode=certificate
      - xpack.license.self_generated.type=${LICENSE}
    mem_limit: ${MEM_LIMIT}
    ulimits:
      memlock:
        soft: -1
        hard: -1
    healthcheck:
      test:
        [
          "CMD-SHELL",
          "curl -s --cacert config/certs/ca/ca.crt https://localhost:9200 | grep -q 'missing authentication credentials'",
        ]
      interval: 10s
      timeout: 10s
      retries: 120

  kibana:
    depends_on:
      es01:
        condition: service_healthy
    image: docker.elastic.co/kibana/kibana:${STACK_VERSION}
    volumes:
      - certs:/usr/share/kibana/config/certs
      - kibana-data:/usr/share/kibana/data
    ports:
      - ${KIBANA_PORT}:5601
    environment:
      - SERVERNAME=kibana
      - ELASTICSEARCH_HOSTS=https://es01:9200
      - ELASTICSEARCH_USERNAME=kibana_system
      - ELASTICSEARCH_PASSWORD=${KIBANA_PASSWORD}
      - ELASTICSEARCH_SSL_CERTIFICATEAUTHORITIES=config/certs/ca/ca.crt
    mem_limit: ${MEM_LIMIT}
    healthcheck:
      test:
        [
          "CMD-SHELL",
          "curl -s -I http://localhost:5601 | grep -q 'HTTP/1.1 302 Found'",
        ]
      interval: 10s
      timeout: 10s
      retries: 120

volumes:
  certs:
    driver: local
  es-data:
    driver: local
  kibana-data:
    driver: local
You can find this content on the following link at https://devcraft.me platform.
Now let's go into details of each service and what has been changed from previous example.
We start by defining environment variable - STACK_VERSION to be same as previous version 8.11.1
Next, I've decided to externalize CLUSTER_NAME as environment variable too and to set it as in previous example cluster-ai.
Most notable change is adding two security passwords: one for Elasticsearch itself and one for Kibana. Therefore we've added two environment variables:
ELASTIC_PASSWORD=civilizationandKIBANA_PASSWORD=fireaxisgames
There is also environment varibale LICENSE which is in this example set up to BASIC. Other value can be TRIAL, but in that case you get 30-days trial to experiment with this setup and full security feature set. We are using LICENSE=basic in this example.
Following two env. vars are well known exposed ports for services Elasticsearch and Kibana, 9200 and 5601 respectively.
At the end we've externalized one more property, Memory Limit as MEM_LIMIT and we've set it up to value of 1GB.
Now let's jump to changes that have to be made to docker-compose.yaml file.
First notable change is that there is service setup that was added as 1st service.
This one is used to create certificates and to create password for Elasticsearch and Kibana.
If you by any chance ommit to provide two environment variables: ELASTIC_PASSWORD and KIBANA_PASSWORD then once you start docker-compose.yaml you will end up with one or another following error, respectively:
single-node-with-security-setup-1  | Set the ELASTIC_PASSWORD environment variable in the .env file
single-node-with-security-setup-1 exited with code 1
or
single-node-with-security-setup-1  | Set the KIBANA_PASSWORD environment variable in the .env file
single-node-with-security-setup-1 exited with code 1
These are the warning/error messages that will be presented to you in case that you miss to provide passwords.
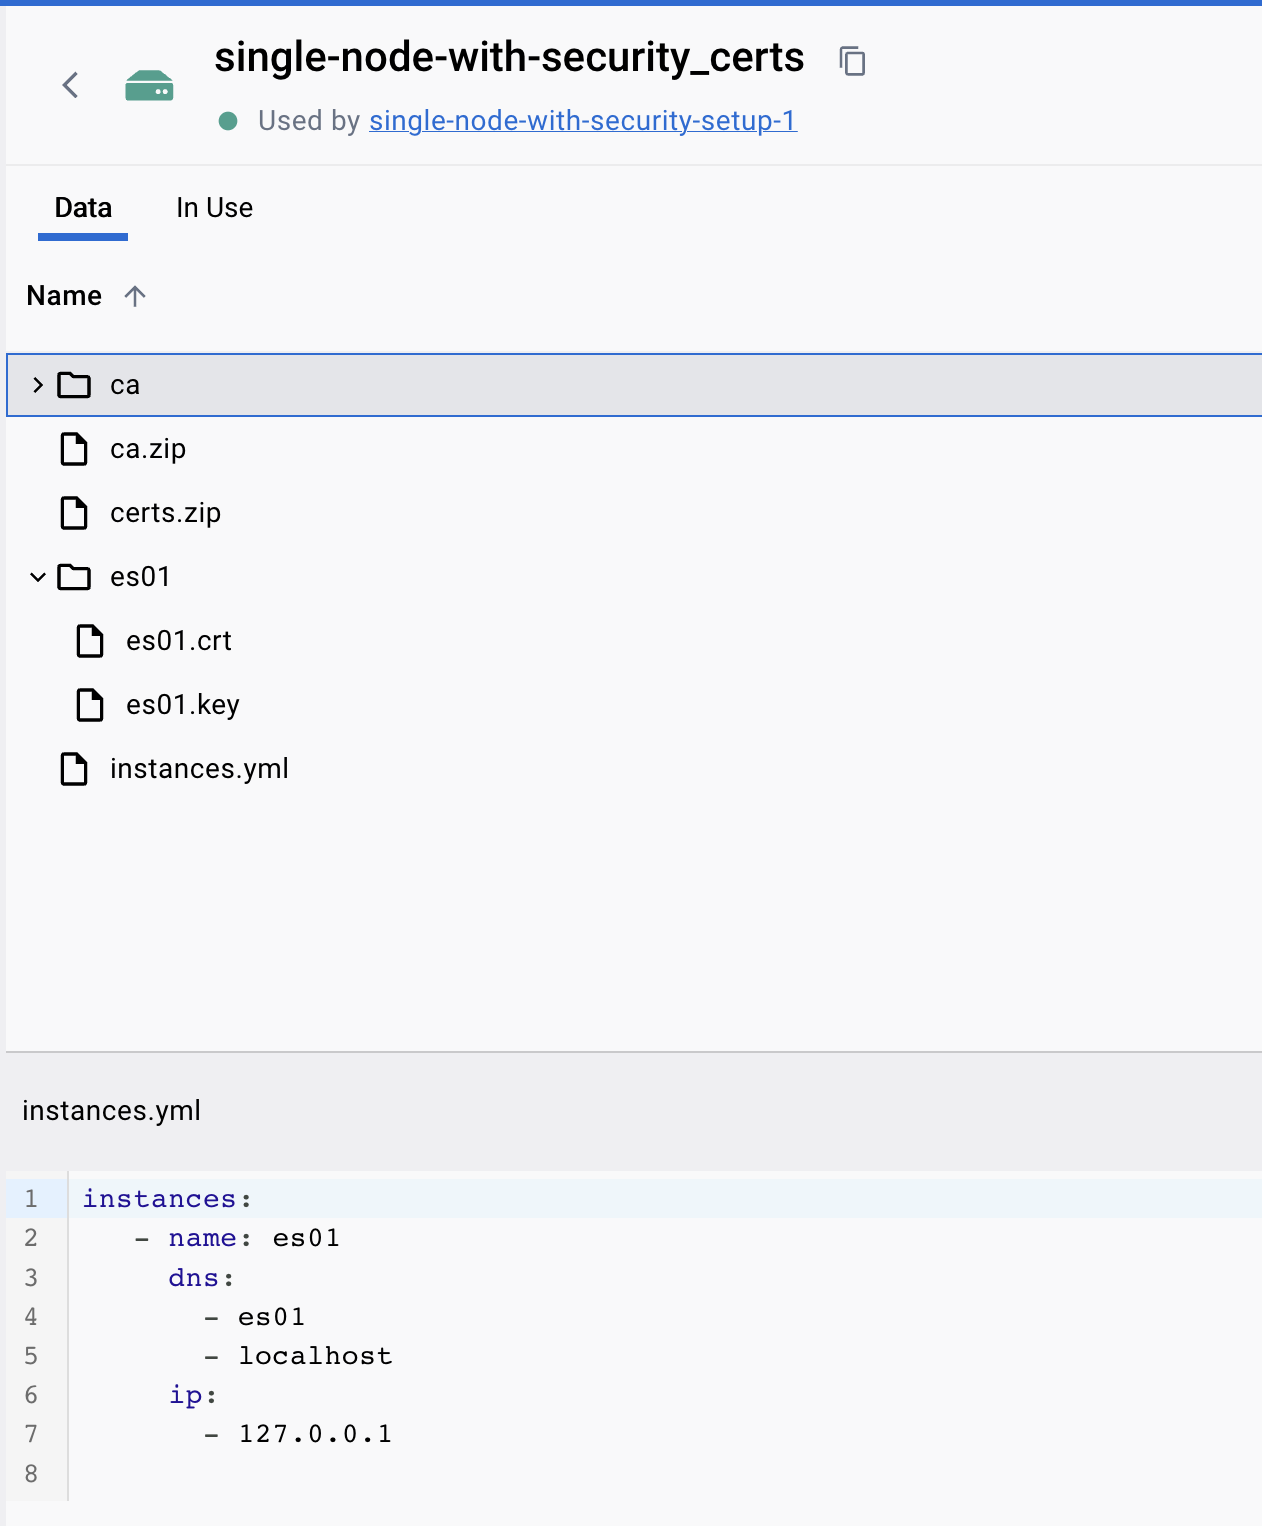
This setup service will create (lean on) shared Docker Volume certs and will create/populate SSL certificates in order to correctly setup security arround services.
You can inspect content of that volume, but here is how it should look like:
Following is definition of Elasticsearch and Kibana services.
Worth of mention, comparing to previous example are bunch of X Pack security variables, all starting with change xpack.security.enabled=true
NOTE: Beside that I want to stress out one more change, and that is fact that setting property discovery.type=single-node was not enough.If you ommit to add another one, this discovery.seed_hosts = [] then you'll end up with Elasticsearch not starting. Luckily, ES crew, made logging correctly so I was able to identify issue very quickly. You can find more information on the following URL:
https://www.elastic.co/guide/en/elasticsearch/reference/8.11/_discovery_configuration_check.html
Since now we have everything in place, we can execute Docker Compose UP command and start all the services:
$ docker compose up -d
[+] Building 0.0s (0/0)                                                                                                                                                                                                         docker:desktop-linux
[+] Running 3/3
 ✔ Container single-node-with-security-setup-1   Healthy                                                                                                                                                                                        0.0s
 ✔ Container single-node-with-security-es01-1    Healthy                                                                                                                                                                                        0.0s
 ✔ Container single-node-with-security-kibana-1  Started                                                                                                                                                                                        0.0s
Again you can check docker process list by executing
$ docker ps -a
CONTAINER ID   IMAGE                                                  COMMAND                  CREATED              STATUS                        PORTS                              NAMES
4243972ef607   docker.elastic.co/kibana/kibana:8.11.1                 "/bin/tini -- /usr/l…"   About a minute ago   Up 48 seconds (healthy)       0.0.0.0:5601->5601/tcp             single-node-with-security-kibana-1
30d89e8f6195   docker.elastic.co/elasticsearch/elasticsearch:8.11.1   "/bin/tini -- /usr/l…"   About a minute ago   Up About a minute (healthy)   0.0.0.0:9200->9200/tcp, 9300/tcp   single-node-with-security-es01-1
28bc6a995225   docker.elastic.co/elasticsearch/elasticsearch:8.11.1   "/bin/tini -- /usr/l…"   About a minute ago   Exited (0) 36 seconds ago                                        single-node-with-security-setup-1
Again you can open you favorite browser and type Kibana URL - https://localhost:5601
This time we have Login screen, where we need to provide our credentials
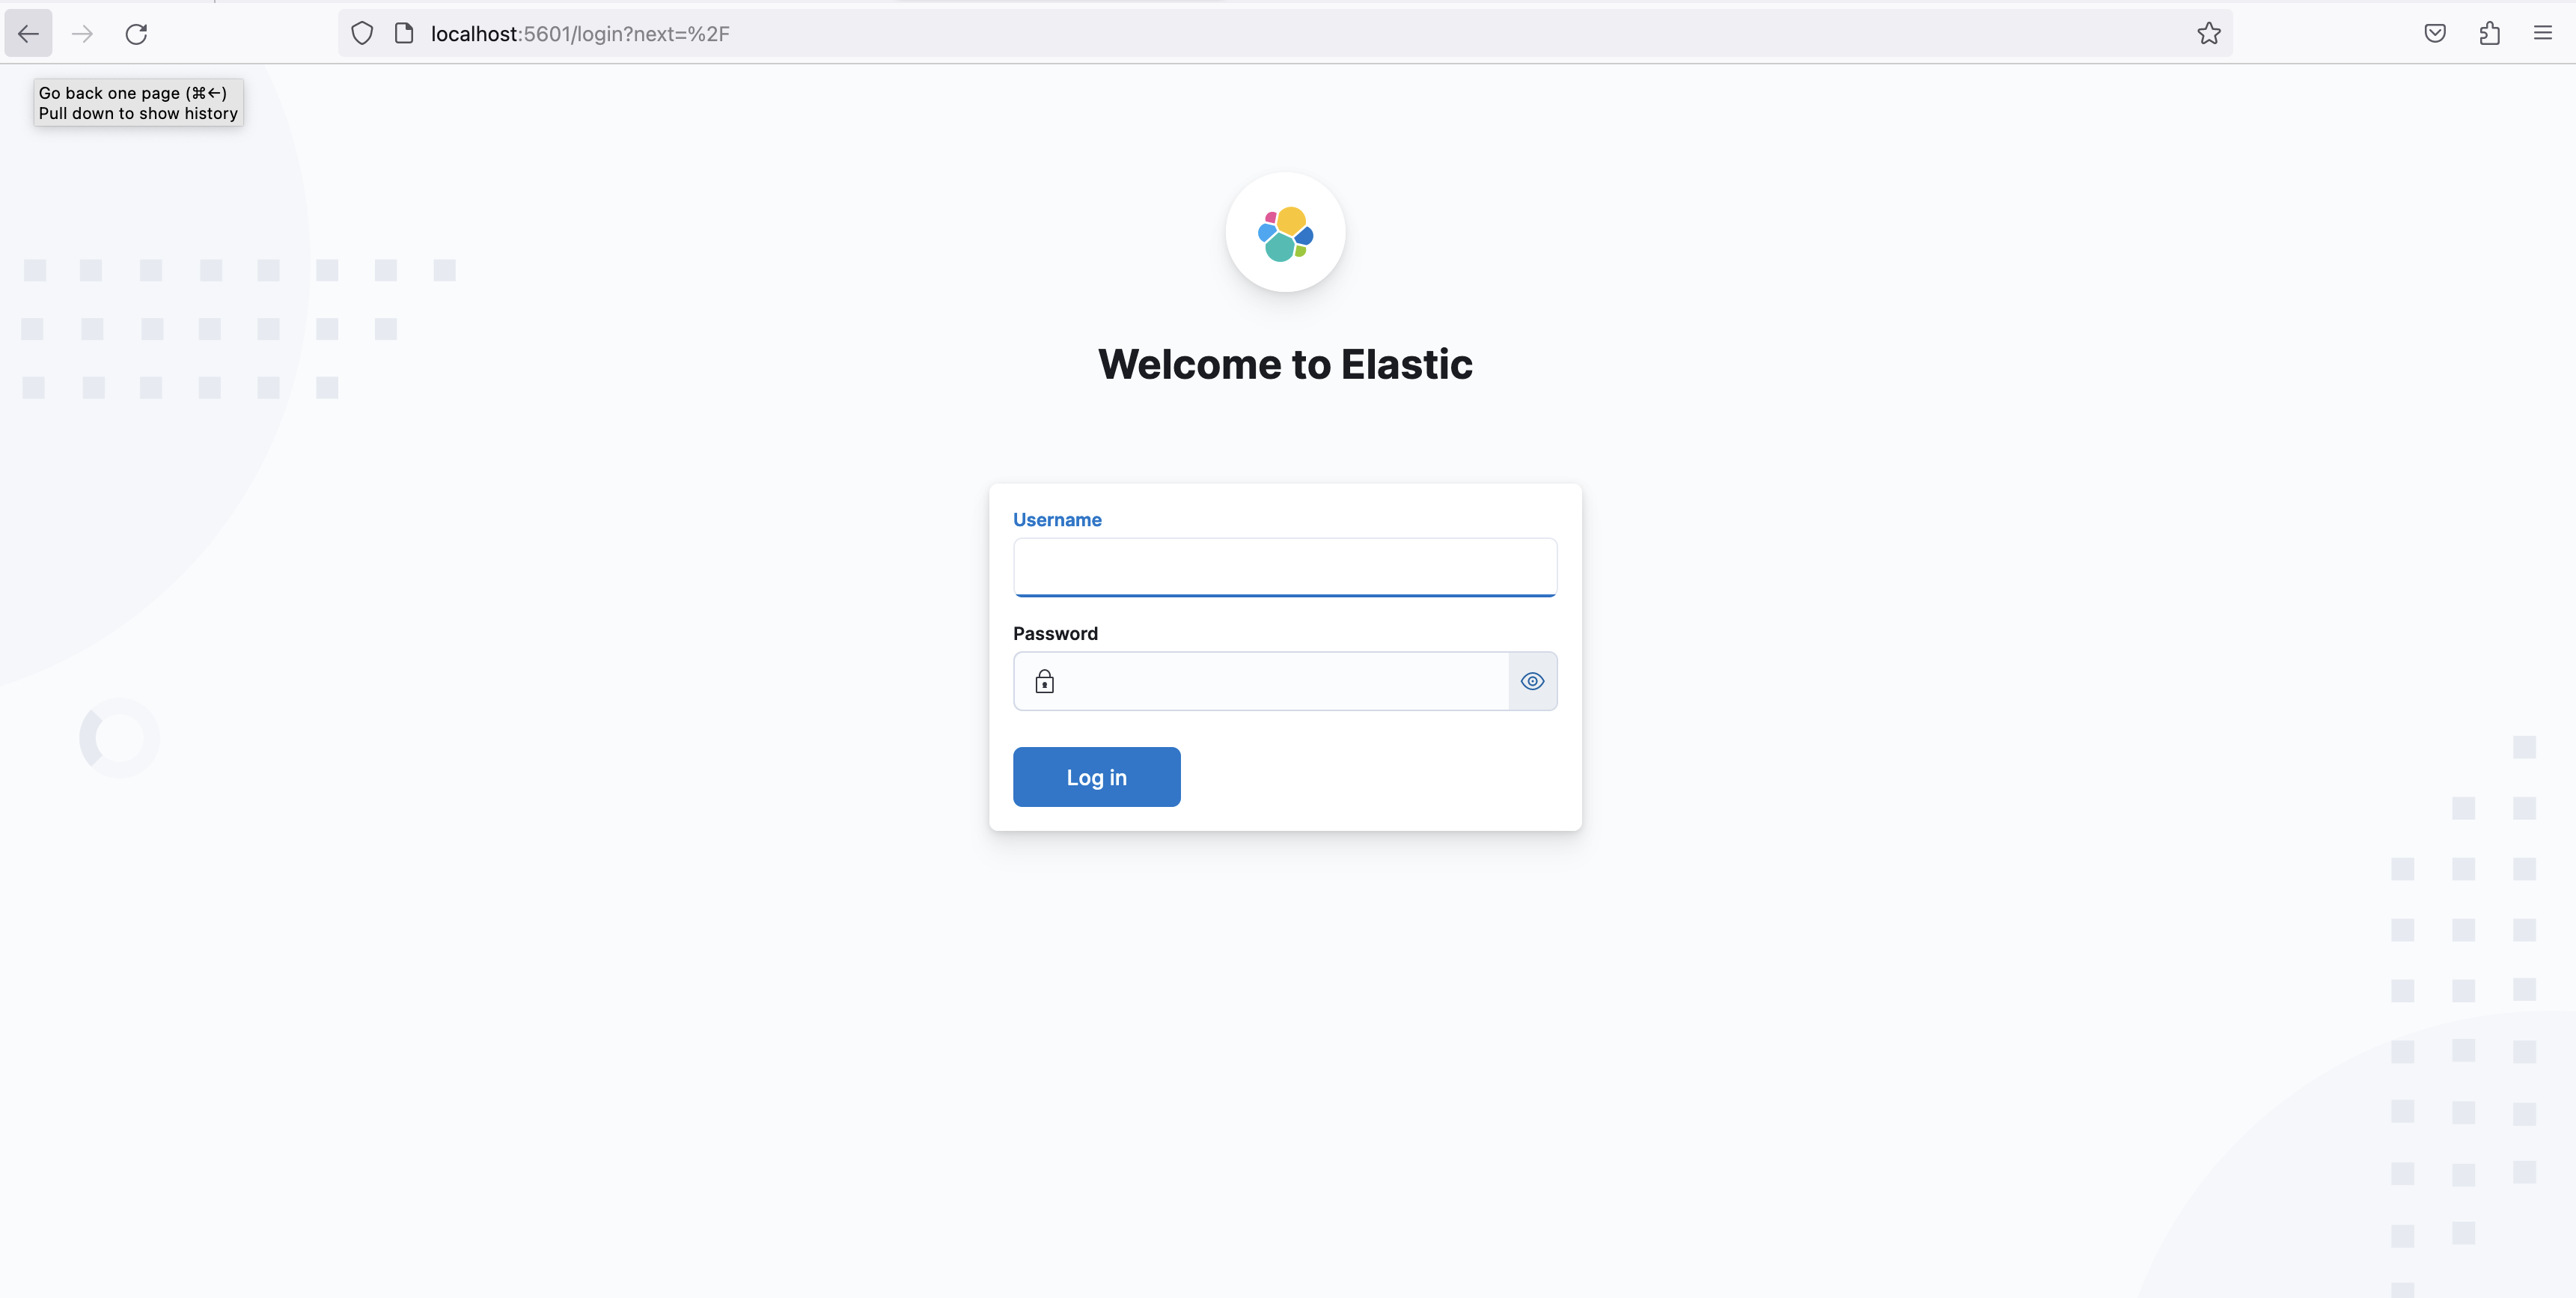
Use following credentials that we've setup:
username: elastic
password: civilization
And you'll end up with same Kibana welcome screen as we did in previous example.

That concludes this blog post.
Conclusion
We've exampled how to setup Elasticsearch and Kibana both ways: without or with security features, that can be easily startup by docker compose command.
Hope you like it! Clap, comment or just say Hi! :)
Bonus content
Multi-node Elasticsearch and Kibana setup you can find as bonus content and script files following this link at https://devcraft.me platform.